Introduction
Welcome to Wasmind – a modular AI agent coordination system for building massively parallel agentic systems.
What is Wasmind?
Wasmind is an actor-based system for building AI agent workflows. Instead of monolithic AI applications, you compose small, focused actors that each handle specific capabilities.
Actors are WebAssembly components that typically fall into three categories:
- Assistant actors - manage LLM interactions and conversation flow
- Tool actors - provide capabilities like file manipulation, code execution, and web access
- Coordination actors - enable complex multi-agent workflows and delegation
Actors communicate through structured message passing, enabling coordination at any scale – from simple workflows to networks of thousands of coordinated agents.
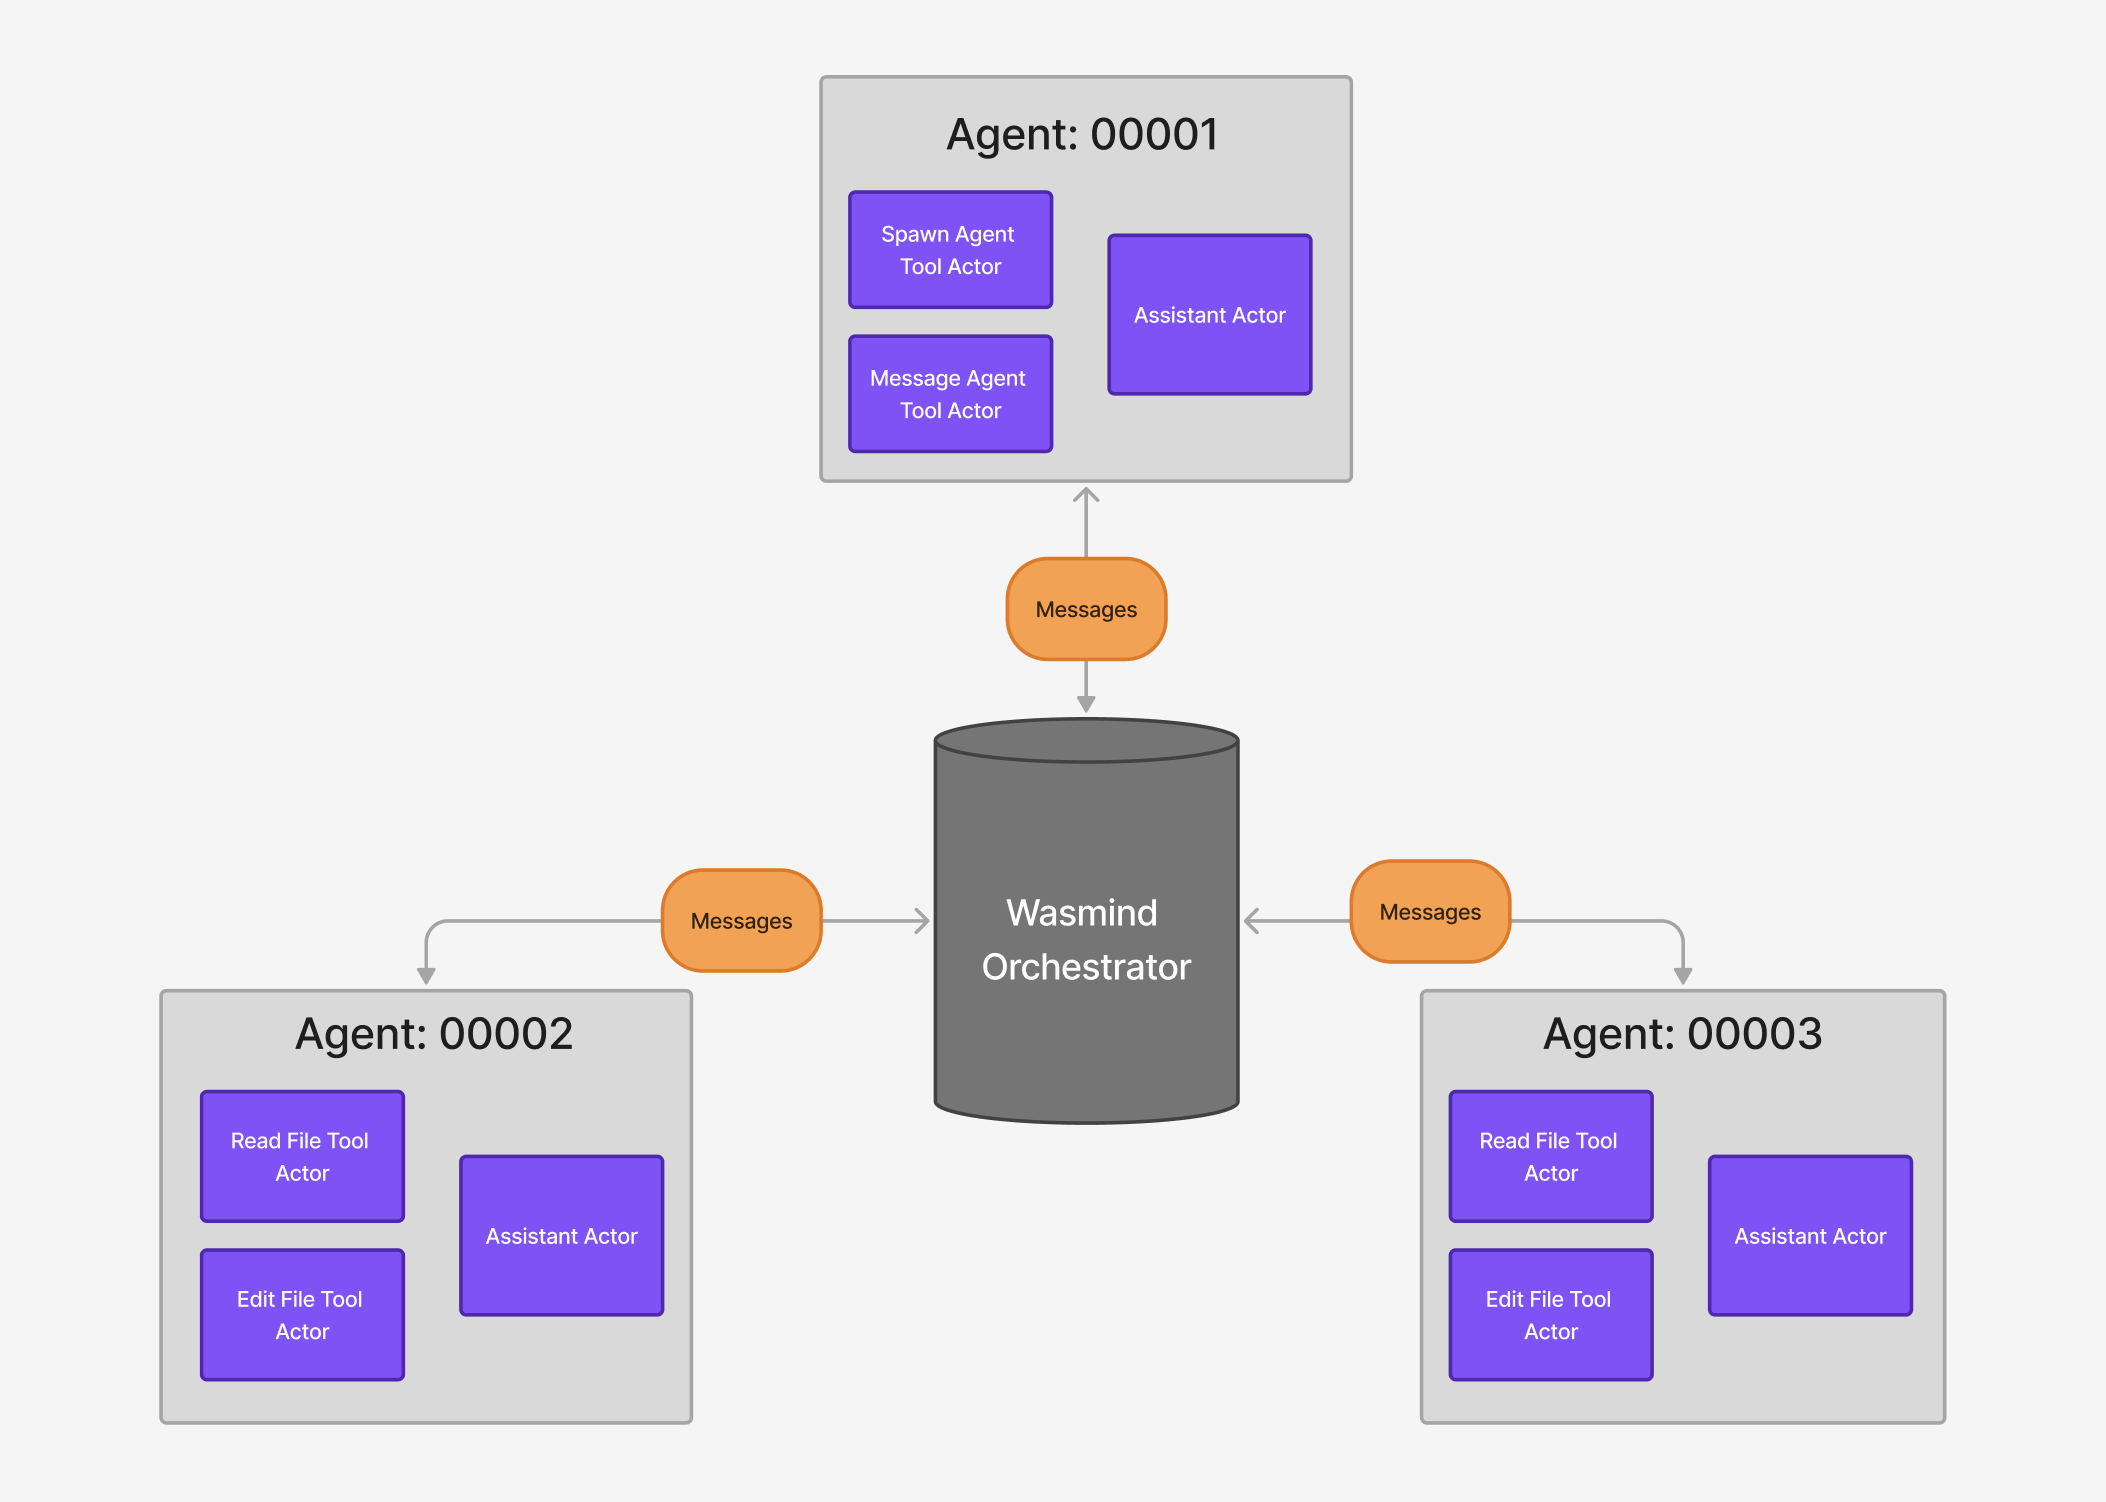
A simplified architecture diagram showing the Wasmind orchestrator coordinating multiple agents through message passing. Each agent contains different types of actors (Assistant, Tool, etc.) that handle specific capabilities.
Why Choose Wasmind?
🏗️ Modular by Design
Build systems from small, focused components rather than monolithic applications. Each actor handles one thing well.
🚀 Massively Parallel
The actor model naturally supports thousands of concurrent agents with minimal overhead. Scale from simple workflows to complex multi-agent systems.
🔒 Secure & Sandboxed
WebAssembly provides sandboxed execution with capability-based security. Actors can only access what you explicitly grant them (config for this coming soon).
🌐 Language Independent
Write actors in Rust, Python, JavaScript, or any language that compiles to WebAssembly components.
🔄 Message-Driven Coordination
Actors coordinate through structured message passing, making complex multi-agent behaviors easy to reason about and debug.
What You Can Build
Wasmind enables entirely new architectures that would be impossible to express in traditional client-server models:
- Hierarchical delegation networks - managers spawn and coordinate specialized workers
- Swarms of specialized agents - thousands of actors working on different parts of a problem
- Interactive multi-agent systems - like Claude Code but with manager → sub-manager → worker patterns
- Collaborative workflows - agents that review, approve, and coordinate each other's work
Important Note
Wasmind is NOT a Claude Code alternative – it's the infrastructure that makes projects like Claude Code possible. Our
wasmind_clidemonstrates how to build Claude Code-style interactions using Wasmind's coordination primitives.
How This Book is Organized
This book is divided into two main sections:
📚 User Guide
For people who want to use Wasmind configurations and existing actors:
- Getting started with the CLI
- Understanding configurations
- Working with built-in actors
- Running example systems
🛠️ Developer Guide
For people who want to build custom actors and extend Wasmind:
- Creating your first actor
- Understanding message patterns
- Building tool actors
- Testing and development workflows
Prerequisites
To follow along with this book, you should have:
- Basic command-line familiarity - you'll be running commands and editing configuration files
- Completed installation - see the Installation guide for your use case
Ready to get started? First install Wasmind, then explore the Core Concepts that make Wasmind work.
Installation
This page covers installing Wasmind and its dependencies for different use cases.
For Users: Running Wasmind Configurations
If you want to use Wasmind to run AI agent configurations with the CLI:
1. Install Rust
# Install rustup if you haven't already
curl --proto '=https' --tlsv1.2 -sSf https://sh.rustup.rs | sh

# Update to latest stable
rustup update stable
rustup default stable

# Add WebAssembly target for building actors
rustup target add wasm32-wasip1
2. Install the Wasmind CLI
cargo install --locked wasmind_cli
Note: The
wasmind_cliis just one frontend to the Wasmind library. Other applications may build different interfaces using the corewasmindlibrary.
3. Install Docker
The wasmind_cli uses LiteLLM via Docker to provide unified access to AI models:
- macOS/Windows: Install Docker Desktop
- Linux: Install Docker Engine from your package manager
Note: Other frontends/binaries using the Wasmind library may have different LLM integration requirements. This Docker requirement is specific to
wasmind_cli.
4. Install cargo-component
cargo install --locked cargo-component
This is required because Wasmind currently builds all actors locally. This requirement may change in future versions.
5. Verify Installation
wasmind_cli --help
docker --version
cargo component --version
rustc --version  # Should be 1.70+
rustup target list | grep wasm32-wasip1  # Should show "wasm32-wasip1 (installed)"
You should see help output and version numbers for all commands.
For Developers: Building Custom Actors
If you want to build custom actors or extend Wasmind:
Note: Follow all the steps in the "For Users" section above first - the installation requirements are the same, including the
wasm32-wasip1target which is required for building WebAssembly actors.
Next Steps
After installation:
- Users: Continue to the User Guide to run your first configuration
- Developers: Continue to the Developer Guide to build your first actor
Core Concepts
Understanding Wasmind requires grasping four key concepts: Actors, Agents, Messages, and Scopes. These work together to create a flexible system for building multi-agent AI workflows.
The Wasmind architecture showing how actors, agents, messages, and scopes work together. Each agent contains different types of actors that communicate through message passing.
Actors
Actors are the basic building blocks of Wasmind. Each actor is a WebAssembly component that:
- Handles specific capabilities - file manipulation, LLM interaction, command execution, etc.
- Runs in isolation - sandboxed execution with only the capabilities you grant
- Communicates via messages - no shared state, only message passing
- Has a lifecycle - constructor, message handling, destructor
- Has an attached scope - each actor has a scope that is attached to all messages they broadcast
Actor Types
Actors can do anything but are typically broken down into one of three categories:
Assistant Actors: Handle LLM interactions and conversation flow
Example: assistant, conversation_compaction
Purpose: Manage AI conversations, summarize context, route requests
Tool Actors: Expose tools to assistant actors
Example: execute_bash, file_interaction
Purpose: Execute commands, read/write files, etc...
Coordination Actors: Enable complex multi-agent workflows
Example: spawn_agent, send_message
Purpose: Create agent hierarchies, coordinate workflows, delegate tasks
Agents
Agents are groups of actors working together under a shared scope. Think of an agent as a "team" of specialized actors that coordinate to accomplish larger goals.
Agent = Collection of Actors + Shared Scope + Common Purpose

Example Agent:
├── assistant (conversation management)
├── execute_bash (command execution)
├── file_interaction (file operations)
└── send_message (coordination)
Key properties of agents:
- Shared scope - all actors in an agent share the same scope
- Message coordination - actors in an agent can communicate and coordinate their actions
- Hierarchical - agents can spawn other agents
Messages
Messages are how actors communicate. All communication in Wasmind happens through structured message passing.
Message Structure
#![allow(unused)]
fn main() {
Message Envelope {
    message_type: String,    // What kind of message this is
    sender_id: String,       // Who sent it
    scope: String,           // Which scope it belongs to
    payload: Vec<u8>,        // The actual message content
}
}
Message Flow
- Broadcast model - all actors receive all messages via tokio broadcast channels
- Filtering - actors filter messages based on scope and message type
- Handling - actors process messages they're interested in
Common Message Types
"ExecuteToolCall"       - Request to execute a specific tool
"AssistantResponse"     - Response from an LLM
"AddMessage"            - Message input to an assistant
Most message payloads are JSON strings but messages can store anything! Actors typically have a predefined set of messages they look for. For example the execute_bash actor listens for ExecuteToolCall messages.
While we provide a list of commonly used messages in wasmind_actor_utils_common_messages, it is common for actors to broadcast and listen for their own unique messages.
Scopes
Scopes provide hierarchical organization and coordination boundaries for actors and agents.
Scope Hierarchy
Root Scope: 000000
├── Agent A Scope: a1b2c3...
│   ├── Assistant Actor
│   └── Tool Actors
├── Agent B Scope: e5f6g7-...
│   ├── Manager Actor
│   └── Worker Actors
└── Agent C Scope: i9jk12-...
    └── Coordination Actors
A scope is a unique 6-character string that all actors spawned in a scope are given upon initialization. It is common for actors to only listen for messages sent within their scope. For instance, the execute_bash actor only listens for ExecuteToolCall messages sent in its scope. This way it doesn't pick up tool calls from assistants in other scopes.
Actors receive messages from every scope! A health monitoring actor may choose to listen to AssistantResponses from every scope and analyze their contents to ensure all assistants in the network are performing well.
Scopes are nothing more than an identifier sent to an actor when it first spawns, and attached to all messages broadcast from actors.
How It All Works Together
Let's trace through a concrete example with message types and scopes:
-
Human sends input
- Message:
AddMessagewith payload "Help me write a Python script" - Scope:
000000(root scope) - Broadcast to ALL actors in the system
- Message:
-
Assistant actor filters and processes
- Receives the message (along with all other actors)
- Filters: Only processes
AddMessagein scope000000 - Decides it needs file manipulation capabilities
-
Assistant requests tool execution
- Message:
ExecuteToolCallwith payload containing tool details - Scope:
000000(same scope as assistant) - Broadcast to ALL actors
- Message:
-
Tool actor filters and executes
file_interactionactor receives the message- Filters: Only processes
ExecuteToolCallin scope000000 - Executes file operation, sends response
- Message:
ToolCallResponsewith file contents - Scope:
000000
-
Assistant formulates response
- Receives
ToolCallResponse(filters for its scope) - Generates Python script based on context
- Message:
AssistantResponsewith the script - Scope:
000000
- Receives
-
For complex tasks - spawning sub-agents
- Coordinator spawns new agent with scope
abc123 - New agent's actors initialized with scope
abc123 - Messages within new agent use scope
abc123 - Parent agent can still monitor by listening to all scopes
- Coordinator spawns new agent with scope
-
Cross-scope monitoring
- Health monitor listens to
AssistantResponsefrom ALL scopes - Doesn't filter by scope - sees everything
- Can detect issues across entire system
- Health monitor listens to
Key insight: Every actor sees every message. Scopes are just metadata for filtering - they enable coordination boundaries without limiting visibility.
Next Steps
Now that you understand the core concepts, you can:
- Use Wasmind → Start with the User Guide
- Build with Wasmind → Jump to the Developer Guide
User Guide
Welcome to the Wasmind User Guide! This section is for people who want to use Wasmind to run AI agent configurations and work with existing actors.
What You'll Learn
In this guide, you'll learn how to:
- Get started quickly with the Wasmind CLI and your first configuration
- Understand configurations and how to customize them for your needs
- Work with built-in actors like assistants, tools, and coordinators
- Run real examples including chatbots and delegation networks
If you want to build custom actors or extend Wasmind itself, check out the Developer Guide instead.
Prerequisites
Before starting, make sure you have completed the user installation from the Installation section.
You should also have:
- Basic command-line familiarity (you'll be running commands and editing files)
Guide Structure
This guide is organized into focused sections:
Getting Started
Install the CLI, run your first configuration, and understand the basic workflow.
Configuration
Learn how Wasmind configurations work and how to customize them for your needs.
Using Actors
Understand the different types of actors and how to work with them in your configurations.
Examples
Walk through complete examples including chatbots, delegation networks, and collaborative workflows.
Ready to get started? Let's install and run your first Wasmind configuration!
Getting Started
This guide will walk you through running your first AI agent configuration with Wasmind.
Verify Installation
First, let's make sure everything is installed correctly:
# Check that all tools are available
wasmind_cli --version
docker --version
cargo component --version

# Verify WASI target is installed (required for building actors)
rustup target list | grep wasm32-wasip1
You should see version numbers for all three commands and wasm32-wasip1 (installed) in the target list. If any command fails or the WASI target shows as not installed, go back to the Installation guide.
Understanding the CLI
The Wasmind CLI provides helpful commands to get information about your setup:
# Get information about default locations and system details
wasmind_cli info

# Check a configuration file for errors
wasmind_cli check -c your-config.toml

# Clean cached actor builds
wasmind_cli clean
The info command shows you the default configuration location and other useful paths.
Create Your First Configuration
Create a new file called assistant.toml with the following content:
# Simple Assistant Configuration
# A basic AI assistant for getting started with Wasmind

starting_actors = ["assistant"]

##############################
# TUI Config #################
##############################

[tui.dashboard.key_bindings]
"ctrl-c" = "Exit"
"esc" = "InterruptAgent"

[tui.chat.key_bindings]
"ctrl-a" = "Assist"

##############################
# Actors Config ##############
##############################

[actors.assistant]
source = { git = "https://github.com/SilasMarvin/wasmind", sub_dir = "actors/assistant" }

[actors.assistant.config]
model_name = "openai/gpt-5-mini"

##############################
# LiteLLM Config #############
##############################

[litellm]
image = "ghcr.io/berriai/litellm:main-latest"
port = 4000
container_name = "wasmind-litellm"

[[litellm.models]]
model_name = "openai/gpt-5-mini"

[litellm.models.litellm_params]
model = "openai/gpt-5-mini"
api_key = "os.environ/OPENAI_API_KEY"
Let's understand what you just created:
starting_actors- When Wasmind starts, it automatically starts with these actors: the "assistant"[actors.assistant]- Defines where to find the assistant actor (fetched from GitHub)[actors.assistant.config]- Configures the assistant to use GPT-5-mini[tui.*]- Sets up keyboard shortcuts for the terminal interface[litellm]- Configures the AI model proxy that handles API calls
What this creates: A single AI agent that can have conversations but has no access to tools like file editing, command execution, or web browsing. It's a pure conversational assistant.
Want to customize? The Configuration guide explains how to modify these settings, add more actors, and create more complex setups.
Run Your Configuration
Now run your configuration:
# Set your API key (if using OpenAI)
export OPENAI_API_KEY="your-api-key-here"

# Run your assistant configuration
wasmind_cli -c assistant.toml
Note: You'll need an OpenAI API key set as the
OPENAI_API_KEYenvironment variable. If you don't have one, you can modify the configuration to use other models from LiteLLM's supported providers.
Wasmind will:
- Start the LiteLLM proxy in Docker
- Fetch and build the assistant actor from GitHub
- Launch the terminal user interface (TUI)
Understanding the TUI
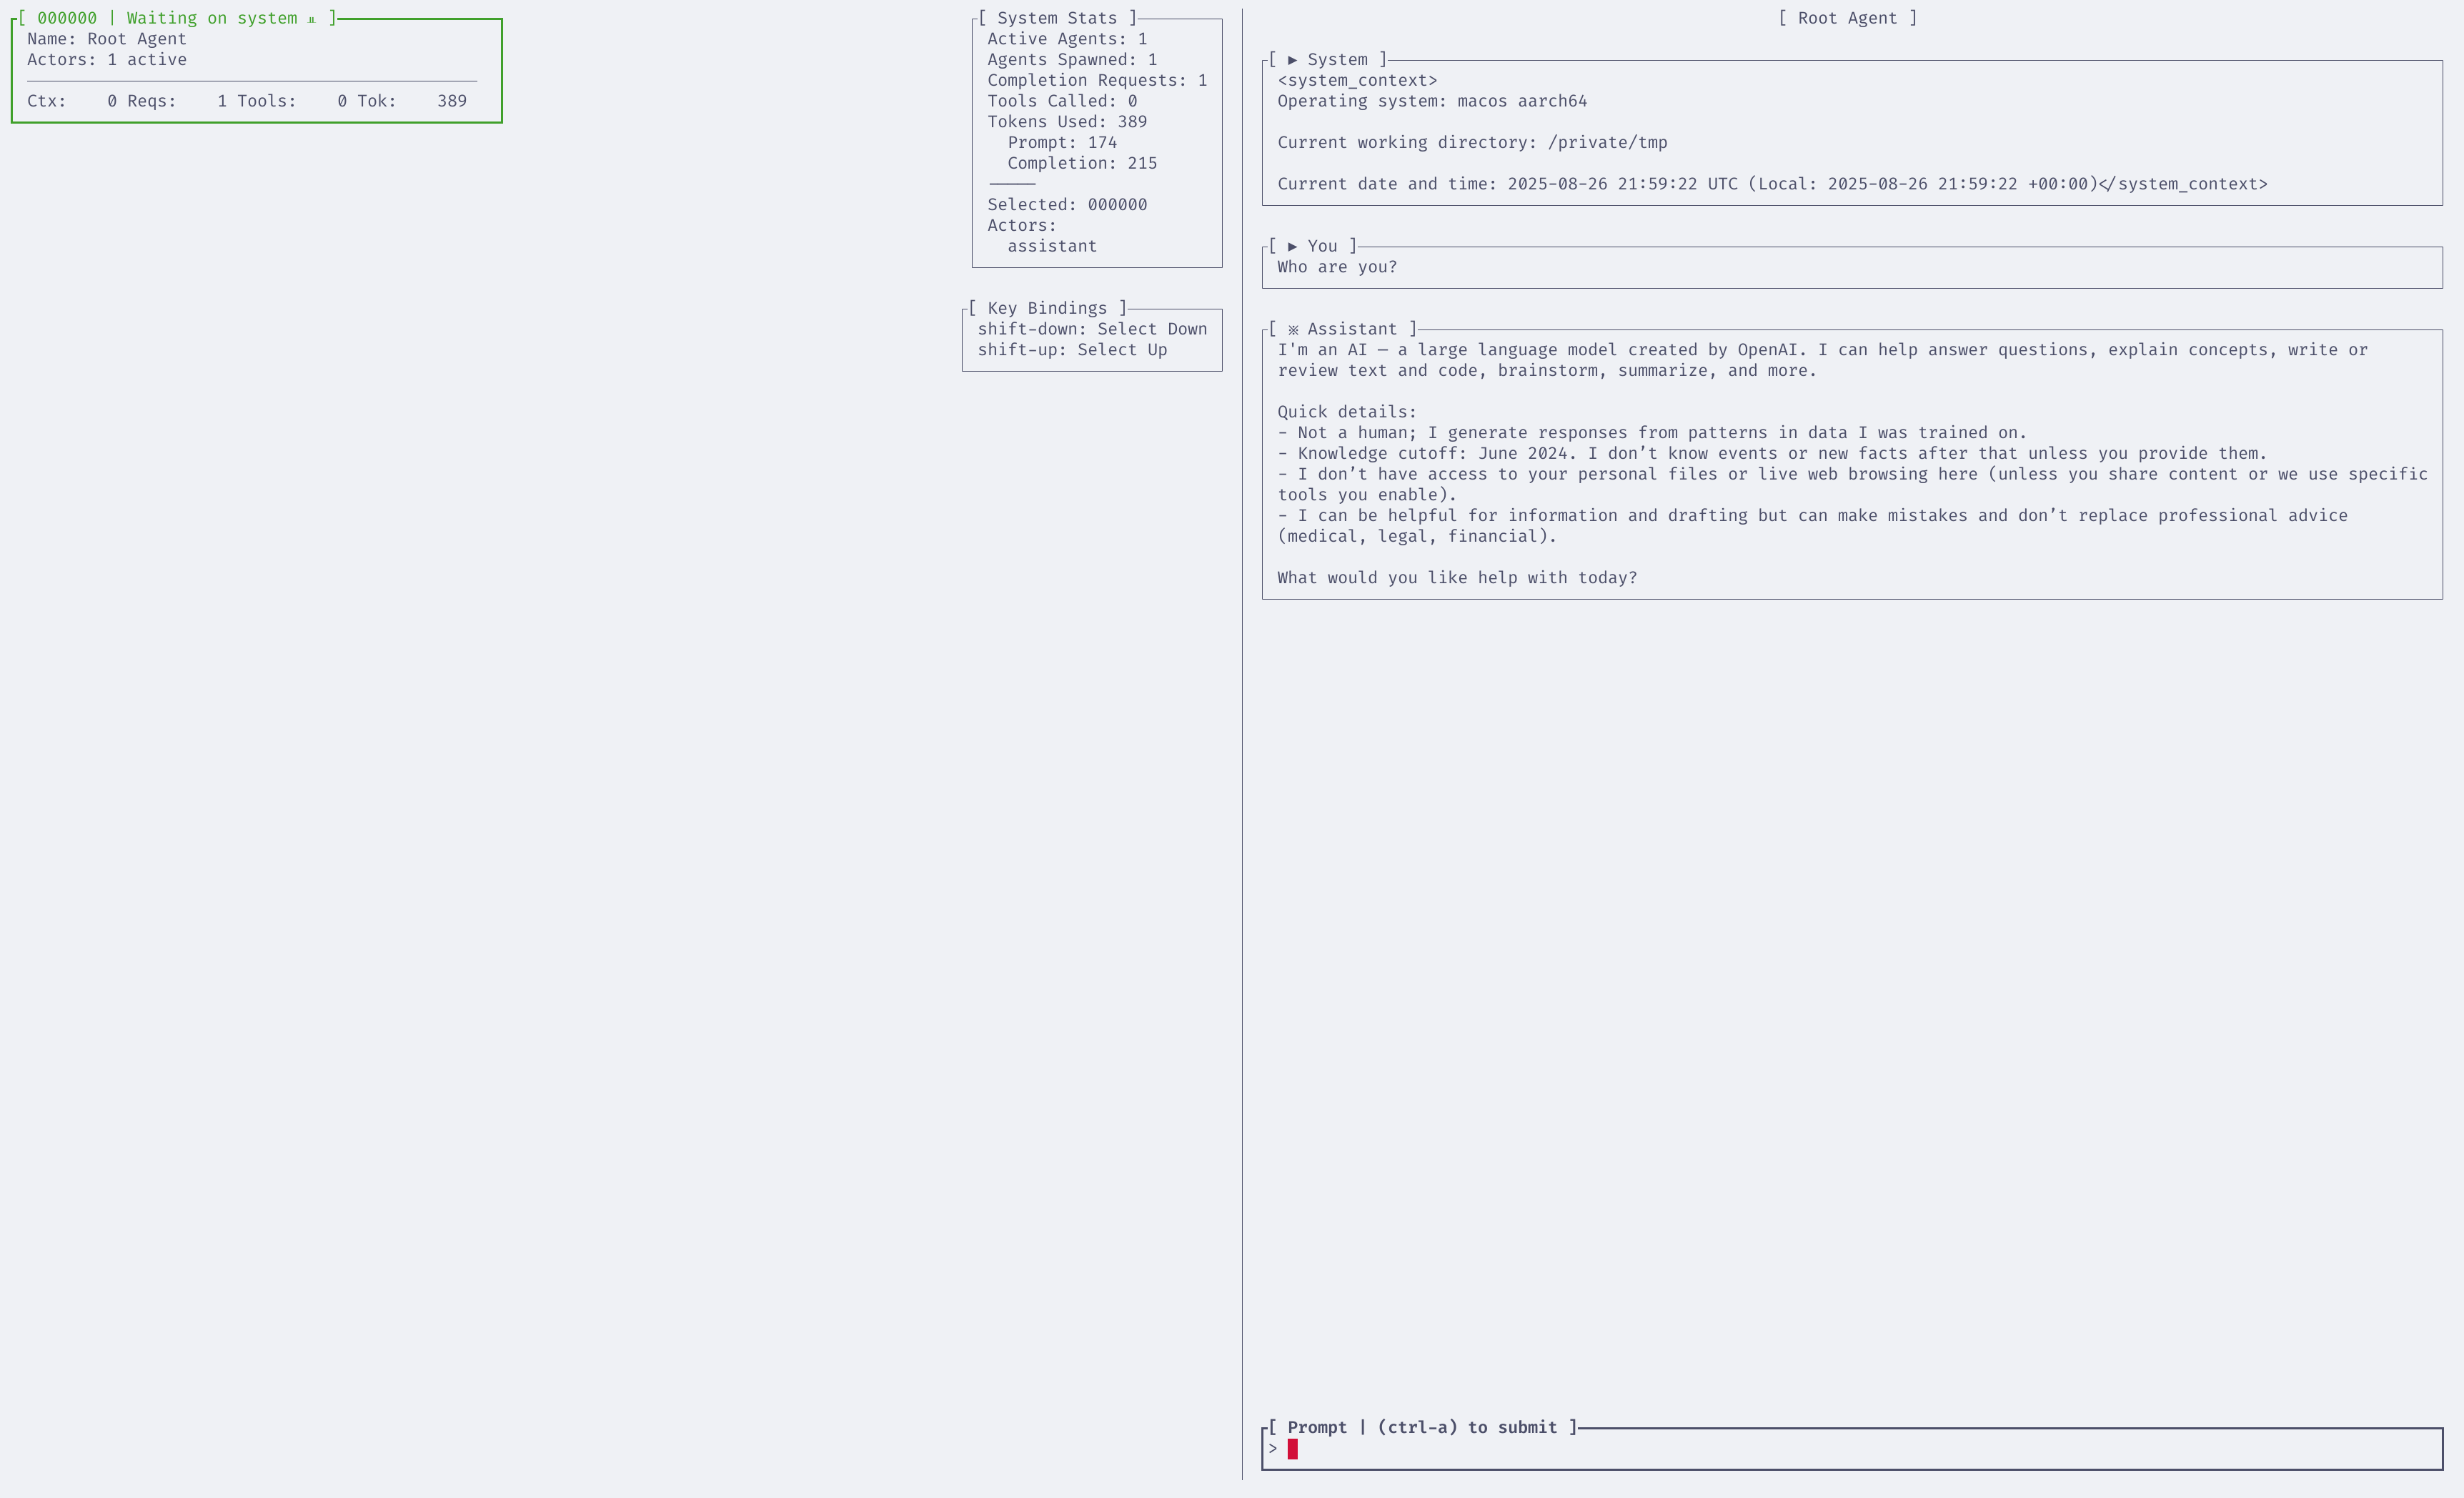
The Wasmind TUI provides an interactive dashboard with a split view:
Chat View
- Purpose: Interact directly with your AI assistant
- Usage: Type messages and press
Ctrl+Ato send them to the assistant - Key Features: See conversation history, assistant responses, and any tool usage
Graph View
- Purpose: Visualize agent relationships and message flow
- Usage: See how actors are connected and how messages flow between them
- Key Features: Real-time message visualization, actor hierarchy
Tip: For advanced TUI configuration options like custom key bindings, see the wasmind_cli documentation.
Try It Out
In the Chat view:
- Type a message like "Hello! Can you help me understand what you can do?"
- Press
Ctrl+Ato send it to the assistant - Watch the assistant respond in real-time
Since this is a basic assistant with no tools, it can have conversations but can't perform actions like running commands or editing files.
What Just Happened?
When you ran wasmind_cli -c assistant.toml, here's exactly what happened:
- Parsed the configuration - Read and validated your
assistant.tomlfile - Started LiteLLM proxy - Launched the Docker container to handle AI model API calls
- Discovered and compiled actors - Found the assistant actor source on GitHub, compiled it to WebAssembly
- Loaded starting actors - Instantiated the actors listed in
starting_actors(just "assistant" in this case) - Launched the TUI - Started the terminal user interface for you to interact with the system
The assistant actor is now running as a WebAssembly component, ready to receive messages and make API calls to GPT-5-mini through the LiteLLM proxy.
Next Steps
Congratulations! You've successfully run your first Wasmind configuration. Here's where to go next:
Learn About Configuration
Ready to customize your setup? The Configuration guide covers:
- Understanding configuration file structure
- Adding more actors and capabilities
- Customizing TUI settings
- Working with different AI models
Explore Complex Examples
Want to see what's possible? The Examples guide walks through:
- Multi-agent delegation networks
- Tool-enabled assistants
- Collaborative approval workflows
- Custom coordination patterns
Understand Actor Types
Curious about the building blocks? The Using Actors guide explains:
- Different types of actors available
- How actors work together
- When to use each actor type
- Actor capabilities and limitations
Build Your Own Actors
Want to extend Wasmind? Check out the Developer Guide to learn how to build custom actors and extend the system.
Configuration
This guide shows you how to customize Wasmind configurations for your needs. Whether you're starting fresh or building on an existing setup, you'll learn how to add actors, configure models, and create powerful multi-agent systems.
Building on Your First Configuration
Let's start with a basic assistant and gradually add more capabilities. If you're following from Getting Started, you can enhance your existing configuration. If you're starting here, you can create these configurations from scratch.
Adding Tool Actors
The basic assistant can only chat - let's give it some tools. Here's how to add bash execution capability:
# Enhanced Assistant Configuration
starting_actors = ["assistant", "execute_bash"]

##############################
# Actors Config ##############
##############################

[actors.assistant]
source = { git = "https://github.com/SilasMarvin/wasmind", sub_dir = "actors/assistant" }

[actors.assistant.config]
model_name = "openai/gpt-5-mini"

# Add a bash execution actor
[actors.execute_bash]
source = { git = "https://github.com/SilasMarvin/wasmind", sub_dir = "actors/execute_bash" }

##############################
# TUI Config #################
##############################

[tui.dashboard.key_bindings]
"ctrl-c" = "Exit"
"esc" = "InterruptAgent"

[tui.chat.key_bindings]
"ctrl-a" = "Assist"

##############################
# LiteLLM Config #############
##############################

[litellm]
image = "ghcr.io/berriai/litellm:main-latest"
port = 4000
container_name = "wasmind-litellm"

[[litellm.models]]
model_name = "openai/gpt-5-mini"

[litellm.models.litellm_params]
model = "openai/gpt-5-mini"
api_key = "os.environ/OPENAI_API_KEY"
What changed:
- Added
"execute_bash"tostarting_actors- now both actors start together - Added
[actors.execute_bash]definition - defines where to find the bash actor - The assistant can now execute shell commands when you ask it to!
Working with Different Models
Want to use a different AI model? Here's how to configure various providers:
Using Anthropic Claude
[actors.assistant.config]
model_name = "anthropic/claude-4-sonnet"

[[litellm.models]]
model_name = "anthropic/claude-4-sonnet"

[litellm.models.litellm_params]
model = "anthropic/claude-4-sonnet"
api_key = "os.environ/ANTHROPIC_API_KEY"
Using Local Models with Ollama
[actors.assistant.config]
model_name = "ollama/llama3.2"

[[litellm.models]]
model_name = "ollama/llama3.2"

[litellm.models.litellm_params]
model = "ollama/llama3.2"
api_base = "http://localhost:11434"
See LiteLLM's supported providers for all available options.
Actor Sources: Local vs Remote
Using GitHub Sources (Recommended)
[actors.assistant]
source = { git = "https://github.com/SilasMarvin/wasmind", sub_dir = "actors/assistant" }
- Always gets the latest version
- Works from any directory
- Good for getting started
Using Local Development
[actors.my_custom_actor]
source = { path = "/path/to/my/actor/directory" }
- Use when developing your own actors
- Points to local filesystem
- Good for testing changes
Actor Configuration and Overrides
Direct Configuration vs Overrides
Important: There are two ways to configure actors, and it's crucial to use the right one:
- Direct configuration - For actors YOU define in
[actors.*]:
[actors.assistant]
source = { git = "https://github.com/SilasMarvin/wasmind", sub_dir = "actors/assistant" }

# Configure it directly under the actor definition
[actors.assistant.config]
model_name = "openai/gpt-5-mini"
base_url = "https://api.openai.com/v1"
- Override configuration - For actors that are dependencies of actors you add:
# If you add delegation_network_coordinator, it spawns assistant actors internally
[actors.delegation_network_coordinator]
source = { git = "https://github.com/SilasMarvin/wasmind", sub_dir = "actors/delegation_network/crates/delegation_network_coordinator" }

# Use overrides to configure the assistant actors it spawns
[actor_overrides.main_manager_assistant.config]
model_name = "openai/gpt-5-mini"

[actor_overrides.worker_assistant.config]
model_name = "anthropic/claude-4-sonnet"
When to Use Overrides
Use [actor_overrides.*] when:
- An actor you add has dependencies that spawn other actors
- You want to configure those dependency actors
DO NOT use overrides for actors you directly define in [actors.*] - configure those directly under their definition.
How Actor Dependencies Work
Each actor can define dependencies in its Wasmind.toml manifest file. These dependencies become available for you to configure via overrides.
For example, the delegation network coordinator's manifest defines many dependencies:
# In the actor's Wasmind.toml file
[dependencies.main_manager_assistant]
source = { path = "/Users/silasmarvin/github/wasmind/actors/assistant" }

[dependencies.worker_assistant]
source = { path = "/Users/silasmarvin/github/wasmind/actors/assistant" }

[dependencies.spawn_agent]
source = { path = "../../crates/spawn_agent" }
These dependency names (main_manager_assistant, worker_assistant, etc.) become the names you use in actor_overrides:
# In your user configuration file
[actors.delegation_network_coordinator]
source = { git = "https://github.com/SilasMarvin/wasmind", sub_dir = "actors/delegation_network/crates/delegation_network_coordinator" }

# Configure the dependencies defined in the actor's manifest
[actor_overrides.main_manager_assistant.config]
model_name = "openai/gpt-5-mini"

[actor_overrides.worker_assistant.config]
model_name = "anthropic/claude-4-sonnet"
Key insight: Actor developers define the dependency structure in their Wasmind.toml, and you configure those dependencies in your user configuration via actor_overrides.
Each actor defines what configuration options it accepts. For a complete specification of actor override patterns, see the Wasmind Configuration Documentation.
Starting Actors vs Dynamic Spawning
What starting_actors Controls
The starting_actors list defines which actors launch when Wasmind starts up - it's your initial bootstrap. These actors become the first agent in your system, operating under the root scope:
starting_actors = ["assistant", "execute_bash", "file_interaction"]

[actors.assistant]
source = { git = "https://github.com/SilasMarvin/wasmind", sub_dir = "actors/assistant" }

[actors.execute_bash]
source = { git = "https://github.com/SilasMarvin/wasmind", sub_dir = "actors/execute_bash" }

[actors.file_interaction]
source = { git = "https://github.com/SilasMarvin/wasmind", sub_dir = "actors/file_interaction" }

[actors.file_interaction.config]
allow_edits = true  # Enable both read and write operations
Now your assistant can chat, run commands, AND read/write files!
The Real Power: Dynamic Agent Spawning
Important: starting_actors only controls the initial setup. The real power of Wasmind comes from dynamic agent spawning - coordination actors creating new agents (groups of actors) during runtime.
For example, you might start with just one actor:
starting_actors = ["delegation_network_coordinator"]

[actors.delegation_network_coordinator]
source = { git = "https://github.com/SilasMarvin/wasmind", sub_dir = "actors/delegation_network/crates/delegation_network_coordinator" }
But this single coordination actor can dynamically spawn new agents containing:
- Main manager agent (assistant + coordination actors)
- Sub-manager agents (assistant + coordination actors)
- Worker agents (assistant + tool actors)
- Review agents (specialized assistant actors)
- And many more as needed
Key insight: A simple starting_actors list doesn't limit your system's capability. Complex multi-agent networks are built through dynamic agent spawning, not by listing hundreds of actors in starting_actors.
Important: Each actor has different configuration options. The
execute_bashactor takes no configuration, whilefile_interactioncan be configured to allow/disallow edits. Always check each actor's README for available configuration options.
Interface Customization
The wasmind_cli is just one interface to the Wasmind library. You can customize its behavior:
# Brief TUI customization
[tui.chat.key_bindings]
"ctrl-a" = "Assist"
"ctrl-t" = "ToggleToolExpansion"

[tui.dashboard.key_bindings]
"ctrl-c" = "Exit"
"esc" = "InterruptAgent"
Note: For detailed TUI configuration options, see the wasmind_cli documentation. Remember that you can also build your own interfaces using the core Wasmind library.
Validation and Debugging
Always validate your configurations before running:
# Check your configuration for errors and see what actors will be loaded
wasmind_cli check -c my-config.toml
Next Steps
Add More Complexity
Ready for more advanced setups? The Examples guide shows:
- Multi-agent delegation networks
- Approval workflows
- Custom coordination patterns
Understand Available Actors
Want to know what actors you can use? The Using Actors guide covers:
- Built-in actor types and capabilities
- When to use each actor
- How actors work together
Technical Reference
Need the complete configuration specification? See the Wasmind Configuration Documentation
Using Actors
Now that you understand how to configure Wasmind, let's explore how to choose and work with actors effectively. The key to building successful Wasmind systems is understanding actor compatibility.
Actor Types
Actors in Wasmind typically fall into three categories:
Assistant Actors
LLM-powered actors that handle conversation, reasoning, and decision-making.
- Manage chat history and context
- Interface with AI models through LiteLLM
- Coordinate with other actors to accomplish tasks
Tool Actors
Actors that provide concrete capabilities to the system.
- File system operations (read, write, edit)
- Command execution (bash, system commands)
- Web requests, database access, etc.
- Give assistant actors "hands" to interact with the world
Coordination Actors
Actors that manage multi-agent workflows and communication.
- Spawn new agents dynamically
- Route messages between agents
- Implement delegation and approval patterns
- Enable complex multi-agent coordination
Available Actors
The actors/ directory in the Wasmind repository contains example actors created for demonstration and common use cases:
assistant- Core LLM interaction actorexecute_bash- Command execution capabilityfile_interaction- File read/write operationsconversation_compaction- Background conversation managementdelegation_network/- Multi-agent coordination system- And more...
These are reference implementations, not built-in system components. They demonstrate common patterns and provide starting points for your own configurations.
Browse actors: Check the actors directory to see what's available and read each actor's README for capabilities and configuration options.
Actor Compatibility
Good news: Most actors in the Wasmind repository are designed to work together! The actors in actors/ follow common message patterns, so you can mix and match them freely.
Current State: Most Actors Work Together
The actors you'll find in the repository use compatible message protocols:
# These combinations all work well
starting_actors = ["assistant", "execute_bash", "file_interaction"]
starting_actors = ["delegation_network_coordinator"]
starting_actors = ["assistant", "conversation_compaction"]
You don't need to worry about detailed message compatibility when using actors from the Wasmind repository - they're designed to work together.
When Compatibility Matters
Compatibility becomes important when:
- Using actors from different sources or repositories
- Building your own custom actors
- Mixing very new actors with older ones
For now: Stick with actors from the main Wasmind repository and you'll be fine!
Common Actor Patterns
Here are some popular combinations that work well:
Assistant + Tools Pattern:
starting_actors = ["assistant", "execute_bash", "file_interaction"]
- Assistant coordinates, tools provide capabilities
- Great for interactive development workflows
Coordination Network Pattern:
starting_actors = ["delegation_network_coordinator"]
- Single coordinator spawns and manages multiple agents
- Perfect for complex multi-agent workflows
Simple Chat Pattern:
starting_actors = ["assistant", "conversation_compaction"]
- Basic conversational AI with automatic history management
- Good starting point for chat applications
Testing Your Setup
# Validate your configuration syntax
wasmind_cli check -c your-config.toml

# Test with minimal setups first
# Add actors one at a time to identify any issues
Coming Soon: Actor Registry
The Wasmind ecosystem is growing toward a comprehensive actor registry that will include:
- Community-contributed actors from developers worldwide
- Compatibility metadata showing which actors work well together
- Standardized interfaces for common actor types
- Dependency resolution to automatically include compatible actors
This will make it much easier to discover and compose compatible actors for your use cases.
Next Steps
Explore Real Examples
Ready to see these concepts in action? The Examples guide walks through:
- Complete working configurations
- How different actors coordinate in practice
- Building from simple to complex multi-agent systems
Build Your Own Actors
Want to create compatible actors? The Developer Guide covers:
- Message pattern design
- Building actors that integrate well with existing ones
- Testing actor compatibility
Technical Deep Dive
For the complete technical specification, see the Wasmind Configuration Documentation.
Examples
The best way to learn is by exploring complete, working examples.
Example Configurations
The Wasmind repository includes several example configurations that demonstrate different use cases and patterns. These examples show real-world setups you can use as starting points for your own configurations.
👉 Browse Example Configurations
Each example includes:
- Complete TOML configuration files
- Actor dependencies and overrides
- LiteLLM model setup
- TUI customizations
- Detailed explanations of what each setup demonstrates
Using the Examples
To try an example configuration:
- Copy the configuration to your local directory
- Set your API keys in environment variables
- Run with wasmind_cli:
wasmind_cli -c your-example.toml
More coming here soon...
Developer Guide
Welcome to the Wasmind Developer Guide! This section is for people who want to build custom actors and extend Wasmind's capabilities.
What You'll Learn
In this guide, you'll learn how to:
- Understand actors as WebAssembly components and the foundational architecture
- Build your first actor from scratch using Rust and WebAssembly
- Understand message patterns and how actors communicate effectively
- Create tool actors that provide capabilities to AI assistants
- Test and debug your actors during development
- Build complex systems using coordination patterns
Who This Guide Is For
This guide assumes you want to:
- ✅ Create custom actors for specific use cases
- ✅ Understand Wasmind's internal architecture
- ✅ Build tools and capabilities for AI agents
- ✅ Extend Wasmind with new functionality
If you just want to use existing actors and configurations, check out the User Guide instead.
Prerequisites
Before starting, make sure you have completed the developer installation from the Installation section.
You should also be familiar with:
- Basic Rust programming (you'll be writing Rust code)
- Wasmind's Core Concepts (actors, agents, messages, scopes)
- WebAssembly concepts (helpful but not required - we'll cover what you need)
Guide Structure
This guide is organized into focused sections:
Actors as WebAssembly Components
Start here! Understand the WebAssembly component architecture, host-provided capabilities, and the actor interface contract.
Building Actors
Learn the fundamentals of creating WebAssembly actors, from project setup to your first working actor.
Message Patterns
Understand how actors communicate through messages and implement common coordination patterns.
Tool Actors
Build actors that provide capabilities to AI assistants, including file operations, web access, and custom tools.
Testing
Learn strategies for testing actors in isolation and within larger systems.
Examples
Walk through complete examples of real-world actors including coordination systems and specialized tools.
Reference
Links to all technical documentation, API references, and message type definitions.
Development Philosophy
When building with Wasmind, keep these principles in mind:
- Single Responsibility - Each actor should do one thing well
- Message-Driven - Actors coordinate through structured messages, not shared state
- Composable - Actors should work together to create larger capabilities
- Secure by Default - Only grant actors the capabilities they actually need
Ready to start building? Let's begin with understanding Actors as WebAssembly Components!
Actors as WebAssembly Components
Before building your first actor, it's crucial to understand what you're actually creating: WebAssembly components that run in a sandboxed environment with controlled access to host capabilities.
This isn't just "Rust code with some macros" - you're building self-contained, portable components that interact with the Wasmind host through a well-defined interface.
What Are WebAssembly Components?
WebAssembly Components are a new standard for building composable, portable modules that can run anywhere. Think of them as:
- Sandboxed by default - Can only access capabilities explicitly granted by the host
- Language agnostic - Can be built in Rust, JavaScript, Python, or any WASM-capable language
- Interface-driven - Communicate through strictly typed interfaces, not shared memory
- Portable - Run identically across different operating systems and architectures
In Wasmind, every actor is a WebAssembly component that:
- Imports host-provided capabilities (logging, HTTP, messaging, etc.)
- Exports an actor implementation that handles messages
- Communicates through structured message passing
The Actor Interface Contract
Every Wasmind actor must implement the actor interface defined in Wasmind's world.wit. WIT (WebAssembly Interface Types) is the interface definition language that specifies how components communicate - think of it as similar to Protocol Buffers or GraphQL schemas. Here's what that looks like:
// From world.wit - the core actor interface
resource actor {
    /// Called when the actor is created
    constructor(scope: scope, config: string);

    /// Called for every message broadcast in the system
    handle-message: func(message: message-envelope);

    /// Called when the actor is shutting down
    destructor: func();
}
Key insight: These three functions are the ONLY way the host can interact with your actor. Everything else happens through these entry points.
Message Envelope Structure
All communication uses this standardized envelope:
record message-envelope {
    id: string,                    // Correlation ID for tracing
    message-type: string,          // Unique identifier for message type
    from-actor-id: string,         // Who sent this message
    from-scope: scope,             // Which agent sent this message
    payload: list<u8>,             // Serialized message data
}
Scope is a 6-character string that identifies which agent an actor belongs to. This enables Wasmind's multi-agent coordination - actors in different scopes represent different agents working on different tasks. For example, you might have one agent (scope agent1) handling user questions while another agent (scope agent2) processes files in the background.
Host-Provided Capabilities
The Wasmind host provides these capabilities to all actors through imports:
🗣️ Messaging
interface messaging {
    broadcast: func(message-type: string, payload: list<u8>);
}
How actors communicate with each other - no direct function calls, only message passing.
Note that when called this function creates a MessageEnvelope with the from-scope as the actors scope and a random 6-character id for the message and broadcasts it to all actors.
📝 Logging
interface logger {
    enum log-level { debug, info, warn, error }
    log: func(level: log-level, message: string);
}
Structured logging that integrates with the host's logging system.
🌐 HTTP Requests
interface http {
    record headers {
        headers: list<tuple<string, string>>
    }

    variant request-error {
        network-error(string),
        timeout,
        invalid-url(string),
        builder-error(string),
    }

    record response {
        status: u16,
        headers: headers,
        body: list<u8>,
    }

    resource request {
        constructor(method: string, url: string);
        header: func(key: string, value: string) -> request;
        headers: func(headers: headers) -> request;
        body: func(body: list<u8>) -> request;
        timeout: func(seconds: u32) -> request;
        retry: func(max-attempts: u32, base-delay-ms: u64) -> request;
        retry-on-status-codes: func(codes: list<u16>) -> request;
        send: func() -> result<response, request-error>;
    }
}
Full HTTP client with retry logic, timeouts, error handling, and configurable retry status codes.
⚡ Command Execution
interface command {
    variant exit-status {
        exited(u8),
        signaled(u8),
        failed-to-start(string),
        timeout-expired,
    }

    record command-output {
        stdout: list<u8>,
        stderr: list<u8>,
        status: exit-status,
        stdout-truncated: bool,
        stderr-truncated: bool,
    }

    resource cmd {
        constructor(command: string);
        args: func(args: list<string>) -> cmd;
        current-dir: func(dir: string) -> cmd;
        timeout: func(seconds: u32) -> cmd;
        max-output-bytes: func(bytes: u32) -> cmd;
        env: func(key: string, value: string) -> cmd;
        env-clear: func() -> cmd;
        run: func() -> result<command-output, string>;
    }
}
Execute system commands with fine-grained control over execution environment, output limits, and environment variables.
🏗️ Agent Management
interface agent {
    spawn-agent: func(actor-ids: list<string>, agent-name: string) -> result<scope, string>;
    get-parent-scope: func() -> option<scope>;
    get-parent-scope-of: func(scope: scope) -> option<scope>;
}
Spawn new agents and navigate the agent hierarchy. Query parent relationships for any scope.
💻 Host Information
interface host-info {
    record os-info {
        os: string,
        arch: string,
    }

    get-host-working-directory: func() -> string;
    get-host-os-info: func() -> os-info;
}
Access to real host environment information including OS type and architecture.
The Complete World Definition
The actor-world brings it all together:
world actor-world {
    // What the host provides to actors
    import messaging;
    import command;
    import http;
    import logger;
    import agent;
    import host-info;

    // What actors must provide to the host
    export actor;
}
This defines the complete contract: actors can use any imported capability and must export an actor implementation.
The Convenience of Macros
The wasmind_actor_utils crate provides optional macros that make building actors much simpler:
#![allow(unused)]
fn main() {
// With convenience macros - clean and simple
#[derive(wasmind_actor_utils::actors::macros::Actor)]
pub struct MyActor {
    scope: String,
}

impl GeneratedActorTrait for MyActor {
    fn new(scope: String, config: String) -> Self {
        Self { scope }
    }

    fn handle_message(&mut self, message: MessageEnvelope) {
        // Your actual logic here
    }

    fn destructor(&mut self) {}
}
}
These macros handle all the WebAssembly component plumbing for you - connecting your Rust code to the WebAssembly interface, managing the component lifecycle, and handling message serialization.
Important: These macros are conveniences, not requirements. You could implement the WebAssembly component interface directly if needed, but the macros make development much more pleasant by letting you focus on your actor's logic rather than low-level details. If you're curious about what the macros do or want to implement the interface yourself, check out the macro source code.
Security and Sandboxing
This WebAssembly component architecture enables powerful security capabilities:
Current State:
- Memory isolation - actors can't access each other's memory
- Interface-controlled access - actors can only use explicitly imported capabilities
- Message-based communication - no direct function calls between actors
Planned Security Features:
- File system restrictions - fine-grained control over which files/directories actors can access
- Command execution limits - restrict which system commands can be executed
- Resource limits - CPU, memory, and execution time controls
- Network access controls - granular permissions for HTTP requests
Current Capabilities: Actors currently have access to:
- Full HTTP client functionality
- System command execution with environment control
- Host file system (restrictions planned)
- Structured logging
- Message broadcasting
- Agent spawning and coordination
The sandboxing foundation is in place through WebAssembly's memory isolation and interface-based capability system, with enhanced restrictions coming in future releases.
Key Takeaways
Understanding actors as WebAssembly components explains:
- Why message passing is required - actors are isolated and can't share memory
- Where capabilities come from - the host provides them through imports
- How sandboxing works - actors only have access to explicitly granted capabilities
- Why the interface is strictly typed - WIT ensures type safety across the component boundary
- How portability is achieved - the same component runs identically anywhere
When you build an actor, you're creating a portable, sandboxed component that can run in any Wasmind host environment while only accessing the capabilities it actually needs.
Next Steps
Now that you understand the WebAssembly foundation, you're ready to build your first actor with full knowledge of what's happening under the hood.
The macros and utilities exist to make this easy, but you now understand they're conveniences built on top of a robust, standardized component interface.
Building Actors
Let's build your first Wasmind actor! We'll create a simple "echo" actor that responds to messages.
What You'll Build
By the end of this guide, you'll have:
- A working WebAssembly actor that responds to messages
- Understanding of the basic actor structure
- A complete project you can build on
Prerequisites
Make sure you have:
- Completed the developer installation
- Basic familiarity with Rust
- Understanding of Wasmind's core concepts
- Read Actors as WebAssembly Components to understand the foundational architecture
- The
wasm32-wasip1target installed (rustup target add wasm32-wasip1) - this is required for building WebAssembly actors
Project Setup
Let's create a new actor project:
# Create a new WebAssembly component project
cargo component new echo_actor
cd echo_actor
Configure Cargo.toml
Edit your Cargo.toml to match this structure:
[package]
name = "echo_actor"
version = "0.1.0"
edition = "2024"
license = "MIT"
description = "A simple echo actor for learning Wasmind"

[lib]
crate-type = ["cdylib"]

[dependencies]
wit-bindgen-rt = { version = "0.43", features = ["bitflags"] }
serde = { version = "1", features = ["derive"] }
serde_json = "1"

wasmind_actor_utils = { git = "https://github.com/SilasMarvin/wasmind", features = ["macros"] }

[package.metadata.component.target.dependencies]
"wasmind:actor" = { path = "../wasmind/crates/wasmind_actor_bindings/wit" }
💡 Note: As covered in WebAssembly Components, these macros are conveniences that handle the component plumbing for you.
⚠️ Path Dependency Setup: Currently, you'll need to copy the WIT interface locally:
- Download the WIT file from
https://github.com/SilasMarvin/wasmind/blob/main/crates/wasmind_actor_bindings/wit/world.wit- Save it as
world.witin your actor project directory- Update the path dependency:
"wasmind:actor" = { path = "world.wit" }We're discussing better distribution methods for WIT interfaces in future Wasmind releases.
Create the Actor Manifest
Every actor must have a Wasmind.toml manifest file. Create one in your project root:
# Wasmind.toml
actor_id = "your-namespace:echo_actor"
The actor_id is a globally unique identifier for your actor type. Use your own namespace (like your GitHub username or organization name).
Basic Actor Implementation
Now let's implement the actor. Replace the contents of src/lib.rs:
#![allow(unused)]
fn main() {
use serde::{Deserialize, Serialize};
use wasmind_actor_utils::{
    common_messages::assistant::{AddMessage, ChatMessage, UserChatMessage},
    messages::Message,
};

// Generated bindings from the WIT interface - created by `cargo component build`
#[allow(warnings)]
mod bindings;

// Our actor's configuration structure
#[derive(Deserialize)]
struct EchoConfig {
    prefix: Option<String>,
}

// Generate the actor trait
wasmind_actor_utils::actors::macros::generate_actor_trait!();

// Our main actor struct
#[derive(wasmind_actor_utils::actors::macros::Actor)]
pub struct EchoActor {
    scope: String,
    config: EchoConfig,
}

impl GeneratedActorTrait for EchoActor {
    fn new(scope: String, config_str: String) -> Self {
        // Parse the configuration from TOML
        let config: EchoConfig = toml::from_str(&config_str)
            .unwrap_or_else(|_| EchoConfig { prefix: None });

        // Use host-provided logging capability
        bindings::wasmind::actor::logger::log(
            bindings::wasmind::actor::logger::LogLevel::Info,
            &format!("EchoActor initialized for scope: {}", scope),
        );

        Self { scope, config }
    }

    fn handle_message(&mut self, message: bindings::exports::wasmind::actor::actor::MessageEnvelope) {
        // Only process messages intended for our scope
        if message.to_scope != self.scope {
            return;
        }

        // Try to parse as a chat message -- we ignore all other messages
        if let Some(add_message) = Self::parse_as::<AddMessage>(&message) {
            self.handle_chat_message(add_message);
        }
    }

    fn destructor(&mut self) {
        bindings::wasmind::actor::logger::log(
            bindings::wasmind::actor::logger::LogLevel::Info,
            "EchoActor shutting down",
        );
    }
}

impl EchoActor {
    fn handle_chat_message(&self, add_message: AddMessage) {
        // Only respond to user messages
        if let ChatMessage::User(user_msg) = add_message.message {
            let prefix = self.config.prefix.as_deref().unwrap_or("Echo:");
            let response_content = format!("{} {}", prefix, user_msg.content);

            // Create a response message
            let response = AddMessage {
                agent: self.scope.clone(),
                message: ChatMessage::system(&response_content),
            };

            // Broadcast the response
            let _ = Self::broadcast_common_message(response);

            bindings::wasmind::actor::logger::log(
                bindings::wasmind::actor::logger::LogLevel::Info,
                &format!("Echoed message: {}", response_content),
            );
        }
    }
}
}
Understanding the Code
Let's break down what this actor does:
1. Configuration Structure
#![allow(unused)]
fn main() {
#[derive(Deserialize)]
struct EchoConfig {
    prefix: Option<String>,
}
}
Actors receive their configuration as a TOML string that's automatically passed to the new() function. This actor accepts an optional prefix setting.
2. Actor Struct and Macros
#![allow(unused)]
fn main() {
#[derive(wasmind_actor_utils::actors::macros::Actor)]
pub struct EchoActor {
    scope: String,
    config: EchoConfig,
}
}
The #[derive(Actor)] macro handles the WebAssembly component implementation for you. Every actor has a scope - a 6-character string that identifies which agent it belongs to.
3. Message Handling
#![allow(unused)]
fn main() {
fn handle_message(&mut self, message: MessageEnvelope) {
    if message.to_scope != self.scope {
        return;
    }
    // Try to parse as a chat message
    if let Some(add_message) = Self::parse_as::<AddMessage>(&message) {
        self.handle_chat_message(add_message);
    }
}
}
Actors receive all broadcast messages and can choose which ones to process. This echo actor only responds to messages with its scope, but actors can listen to any messages they want. Here we parse AddMessage - a common message type used for chat interactions.
💡 Going deeper:
AddMessageis just one of many common message types. Actors can also define custom message types for specialized coordination. See Message Patterns for the full ecosystem.
4. Broadcasting Responses
#![allow(unused)]
fn main() {
let _ = Self::broadcast_common_message(response);
}
Actors communicate by broadcasting messages to all other actors in the system. The broadcast_common_message helper is a convenience for common message types.
💡 Going deeper: Broadcasting is just one communication pattern. Actors can also send messages to specific scopes, implement request-response patterns, and coordinate complex workflows. Explore these patterns in Message Patterns.
Building Your Actor
Build the WebAssembly component:
cargo component build
If successful, you'll find your compiled actor at:
target/wasm32-wasip1/debug/echo_actor.wasm
Testing Your Actor
Create a simple configuration to test your actor. Create test_echo.toml:
starting_actors = ["echo_actor", "assistant"]

[actors.echo_actor]
source = { path = "." }

[actors.echo_actor.config]
prefix = "🔄"

[actors.assistant]
source = { git = "https://github.com/SilasMarvin/wasmind", sub_dir = "actors/assistant" }

[actors.assistant.config]
model_name = "openai/gpt-5-mini"

[[litellm.models]]
model_name = "openai/gpt-5-mini"

[litellm.models.litellm_params]
model = "openai/gpt-5-mini"
api_key = "os.environ/OPENAI_API_KEY"
Run it:
export OPENAI_API_KEY=your_api_key
wasmind_cli -c test_echo.toml
When you send a message in the chat, you should see a follow up of a system message respond with the configured prefix!
💡 Testing tip: Notice how your echo actor and the assistant actor work together in the same scope but handle different message types. This demonstrates the foundational pattern of actor composition in Wasmind.
Next Steps
Congratulations! You've built your first Wasmind actor. Here's what to explore next:
Learn Message Patterns
Your echo actor uses basic message handling. Learn more sophisticated patterns in Message Patterns including custom message types, coordination workflows, and advanced routing.
Build Tool Actors
Want to create actors that provide capabilities to AI assistants? See Tool Actors to learn how to build actors that extend what assistants can do.
Add Actor Dependencies
Learn how actors can depend on other actors using Wasmind.toml manifests in the Configuration documentation - enabling complex multi-actor systems that spawn together.
Real Examples
Explore complete actor implementations in Examples including coordination systems and specialized tools.
Key Takeaways
- Every actor needs a
Wasmind.tomlmanifest with a uniqueactor_id - Actors communicate through message broadcasting - they don't call each other directly
- Scope-based routing ensures messages reach the right actor instances
- Configuration is automatically passed as TOML to the actor's
new()function - The
wasmind_actor_utilsmacros are conveniences - actors can be built directly against the WebAssembly interface - Message types define the coordination patterns - common types exist, but you can create custom ones
Your echo actor demonstrates all the fundamental patterns you need to build more sophisticated actors. The simplicity here is intentional - real power comes from combining multiple actors with different capabilities and coordination patterns!
Message Patterns
Messages are the "language" that actors use to coordinate workflows. Your echo actor demonstrated basic message handling - now let's explore the communication patterns that make multi-agent systems possible.
Building on the Echo Actor
Remember your echo actor's simple message handling:
#![allow(unused)]
fn main() {
fn handle_message(&mut self, message: MessageEnvelope) {
    // Check if this message is relevant to our scope
    // (You might check from_scope or message content)
    if let Some(add_message) = Self::parse_as::<AddMessage>(&message) {
        if add_message.agent == self.scope {
            self.handle_chat_message(add_message);
        }
    }
}
}
This was just the beginning. Real actor coordination involves multiple message types and workflows built on top of simple broadcast messaging.
Message Structure Deep Dive
Every message in Wasmind uses the same envelope structure:
#![allow(unused)]
fn main() {
// From the WebAssembly interface
record message-envelope {
    id: string,                    // Correlation ID for tracing (e.g., "parent:child")
    message-type: string,          // Unique identifier (e.g., "wasmind.common.tools.ExecuteTool")
    from-actor-id: string,         // Actor ID that sent this message
    from-scope: scope,             // 6-character scope of the sender
    payload: list<u8>,             // Serialized message data (usually JSON)
}
}
How Message Routing Actually Works
Note: All actors receive all broadcast messages. There's no system-level filtering - actors choose which messages to process:
#![allow(unused)]
fn main() {
fn handle_message(&mut self, message: MessageEnvelope) {
    // Actor chooses which messages to handle
    match message.message_type.as_str() {
        "wasmind.common.assistant.AddMessage" => {
            // Handle chat messages
        }
        "wasmind.common.tools.ExecuteTool" => {
            // Handle tool execution requests
        }
        "wasmind.common.actors.AgentSpawned" => {
            // Maybe react to new agents being created
        }
        _ => {
            // Ignore other message types
        }
    }
}
}
This design gives actors flexibility in choosing what to listen to, enabling various coordination patterns.
The Message Trait (Optional Convenience)
The Message trait is a convenience that makes message handling easier, but it's not required:
#![allow(unused)]
fn main() {
// The convenience trait
pub trait Message: Serialize + DeserializeOwned {
    const MESSAGE_TYPE: &str;
}
}
Important: You don't have to implement this trait. You can work directly with the raw message envelope and handle serialization yourself. However, implementing Message enables convenient helper methods:
#![allow(unused)]
fn main() {
// With Message trait - convenient parsing
if let Some(add_message) = Self::parse_as::<AddMessage>(&message) {
    // Automatically handles JSON deserialization and type checking
}

// With Message trait - convenient broadcasting
Self::broadcast_common_message(add_message)?;

// Without Message trait - manual handling
if message.message_type == "wasmind.common.assistant.AddMessage" {
    if let Ok(json_str) = String::from_utf8(message.payload) {
        if let Ok(add_message) = serde_json::from_str::<AddMessage>(&json_str) {
            // Manual parsing
        }
    }
}
}
The macro-generated helper methods (parse_as and broadcast_common_message) only work with types that implement Message, but you can always handle messages manually if preferred.
Common Message Types
The Wasmind ecosystem includes several common message types that actors frequently use:
Chat and Conversation Messages
AddMessage - Chat Interactions
#![allow(unused)]
fn main() {
pub struct AddMessage {
    pub agent: Scope,
    pub message: ChatMessage,  // User, Assistant, System, or Tool message
}

impl Message for AddMessage {
    const MESSAGE_TYPE: &str = "wasmind.common.assistant.AddMessage";
}
}
Usage pattern: Add messages to an agent's conversation history.
#![allow(unused)]
fn main() {
// Broadcasting a user message
let user_message = AddMessage {
    agent: target_scope.clone(),
    message: ChatMessage::user("Please analyze this code"),
};
Self::broadcast_common_message(user_message)?;
}
SystemPromptContribution - Dynamic System Prompts
#![allow(unused)]
fn main() {
pub struct SystemPromptContribution {
    pub agent: Scope,
    pub key: String,           // "file_reader.open_files"
    pub content: SystemPromptContent,
    pub priority: i32,         // Higher = appears earlier
    pub section: Option<Section>,  // Tools, Guidelines, etc.
}

impl Message for SystemPromptContribution {
    const MESSAGE_TYPE: &str = "wasmind.common.assistant.SystemPromptContribution";
}
}
Usage pattern: Actors contribute to system prompts dynamically as capabilities change.
#![allow(unused)]
fn main() {
// Tool actor announces its capabilities
let contribution = SystemPromptContribution {
    agent: target_scope,
    key: "execute_bash.usage_guide".to_string(),
    content: SystemPromptContent::Text(BASH_USAGE_GUIDE.to_string()),
    priority: 800,
    section: Some(Section::Tools),
};
Self::broadcast_common_message(contribution)?;
}
Tool and Capability Messages
ToolsAvailable - Capability Announcement
#![allow(unused)]
fn main() {
pub struct ToolsAvailable {
    pub tools: Vec<Tool>,  // LLM-compatible tool definitions
}

impl Message for ToolsAvailable {
    const MESSAGE_TYPE: &str = "wasmind.common.tools.ToolsAvailable";
}
}
Usage pattern: Tool actors broadcast their capabilities when they start up.
ExecuteTool - Tool Execution Requests
#![allow(unused)]
fn main() {
pub struct ExecuteTool {
    pub tool_call: ToolCall,           // Function name, arguments, ID
    pub originating_request_id: String, // Links back to the chat request
}

impl Message for ExecuteTool {
    const MESSAGE_TYPE: &str = "wasmind.common.tools.ExecuteToolCall";
}
}
Usage pattern: Assistants request tool execution; tool actors respond.
ToolCallStatusUpdate - Tool Execution Responses
#![allow(unused)]
fn main() {
pub struct ToolCallStatusUpdate {
    pub status: ToolCallStatus,  // Received, AwaitingSystem, Done
    pub id: String,              // Tool call ID
    pub originating_request_id: String,
}

impl Message for ToolCallStatusUpdate {
    const MESSAGE_TYPE: &str = "wasmind.common.tools.ToolCallStatusUpdate";
}
}
Coordination and Status Messages
StatusUpdate - Agent State Management
#![allow(unused)]
fn main() {
pub struct StatusUpdate {
    pub status: Status,  // Processing, Wait, Done
}

impl Message for StatusUpdate {
    const MESSAGE_TYPE: &str = "wasmind.common.assistant.StatusUpdate";
}
}
Usage pattern: Agents communicate their current state for coordination.
AgentSpawned - Agent Lifecycle
#![allow(unused)]
fn main() {
pub struct AgentSpawned {
    pub agent_id: Scope,
    pub name: String,                // "Code Reviewer", "Worker Agent"
    pub parent_agent: Option<Scope>,
    pub actors: Vec<String>,         // ["assistant", "execute_bash"]
}

impl Message for AgentSpawned {
    const MESSAGE_TYPE: &str = "wasmind.common.actors.AgentSpawned";
}
}
Usage pattern: Announces when new agents are created for coordination.
Message Patterns in Action
Pattern 1: Broadcast Communication (One-to-Many)
The simplest pattern - one actor sends a message to all actors:
#![allow(unused)]
fn main() {
// Announce a capability to everyone
let tools_available = ToolsAvailable {
    tools: vec![my_tool_definition],
};
Self::broadcast_common_message(tools_available)?;
}
Use cases:
- Tool actors announcing capabilities
- Status updates
- System-wide notifications
Pattern 2: Scope-Targeted Communication
While all actors receive messages, you can target specific agents by including scope in the message payload:
#![allow(unused)]
fn main() {
fn handle_message(&mut self, message: MessageEnvelope) {
    // Check message type first
    if let Some(add_message) = Self::parse_as::<AddMessage>(&message) {
        // Then check if the message targets our scope
        if add_message.agent == self.scope {
            // Handle messages meant for our agent
        }
    }

    // But also listen for global announcements
    if message.message_type == "wasmind.common.tools.ToolsAvailable" {
        // Anyone can announce new tools
    }
}
}
Use cases:
- Agent-specific instructions
- Targeted status updates
- Private coordination between specific agents
Pattern 3: Request-Response with Correlation
Use correlation IDs to link related messages:
#![allow(unused)]
fn main() {
// Tool execution request
let execute = ExecuteTool {
    tool_call: ToolCall {
        id: "call_123".to_string(),
        // ... other fields
    },
    originating_request_id: "req_456".to_string(),
};
Self::broadcast_common_message(execute)?;

// Later, tool responds with same IDs
let response = ToolCallStatusUpdate {
    status: ToolCallStatus::Done { result: Ok(result) },
    id: "call_123".to_string(),
    originating_request_id: "req_456".to_string(),
};
Self::broadcast_common_message(response)?;
}
Use cases:
- Tool execution workflows
- Multi-step coordination
- Request tracking and timeouts
Pattern 4: Event Streaming
Actors can subscribe to event streams by listening to specific message types:
#![allow(unused)]
fn main() {
fn handle_message(&mut self, message: MessageEnvelope) {
    match message.message_type.as_str() {
        "wasmind.common.actors.AgentSpawned" => {
            // React to new agents being created
            if let Some(agent_spawned) = Self::parse_as::<AgentSpawned>(&message) {
                self.on_new_agent_created(agent_spawned);
            }
        }
        "wasmind.common.assistant.StatusUpdate" => {
            // Monitor agent status changes
            if let Some(status_update) = Self::parse_as::<StatusUpdate>(&message) {
                self.track_agent_status(message.from_scope, status_update.status);
            }
        }
        _ => {}
    }
}
}
Use cases:
- Monitoring and logging actors
- Dynamic system adaptation
- Coordination supervisors
Pattern 5: Multi-Agent Workflows
Workflows involving multiple agents:
#![allow(unused)]
fn main() {
// Step 1: Coordinator spawns a specialized agent
let new_scope = bindings::wasmind::actor::agent::spawn_agent(
    vec!["code_reviewer".to_string()],
    "Code Review Agent".to_string()
)?;

// Step 2: Send the agent a task
let task = AddMessage {
    agent: new_scope.clone(),
    message: ChatMessage::user("Please review this code: ..."),
};
Self::broadcast_common_message(task)?;

// Step 3: Listen for completion
fn handle_message(&mut self, message: MessageEnvelope) {
    if message.from_scope == new_scope
        && message.message_type == "wasmind.common.assistant.StatusUpdate" {
        if let Some(status) = Self::parse_as::<StatusUpdate>(&message) {
            match status.status {
                Status::Done { result } => {
                    // Agent finished, process result
                    self.handle_review_complete(result);
                }
                _ => {}
            }
        }
    }
}
}
Creating Custom Message Types
You can define your own message types for specialized coordination:
#![allow(unused)]
fn main() {
use serde::{Serialize, Deserialize};
use wasmind_actor_utils::messages::Message;

#[derive(Debug, Clone, Serialize, Deserialize)]
pub struct CodeReviewRequest {
    pub code: String,
    pub language: String,
    pub reviewer_scope: String,
    pub priority: u8,
}

impl Message for CodeReviewRequest {
    const MESSAGE_TYPE: &str = "mycompany.codereviewer.ReviewRequest";
}

// Usage with the convenience helpers
fn request_code_review(&self, code: String) -> Result<(), serde_json::Error> {
    let request = CodeReviewRequest {
        code,
        language: "rust".to_string(),
        reviewer_scope: self.reviewer_scope.clone(),
        priority: 5,
    };
    Self::broadcast_common_message(request)  // Uses the Message trait
}
}
Remember: Implementing Message is optional but enables the convenient helper methods. You can always work directly with the raw message envelope and handle serialization manually.
Custom Message Best Practices
- Use reverse DNS naming:
company.actor.MessageName - Make messages self-contained: Include all needed information
- Version your messages: Consider compatibility when changing structure
- Include correlation IDs: For request-response patterns
- Implement
Messagetrait: For convenient helper methods (optional but recommended)
Message Flow Debugging
Understanding message flow helps with debugging. You can view all messages in the system by setting the WASMIND_LOG environment variable:
# View all messages flowing through the system
WASMIND_LOG=debug wasmind_cli
You can also add logging within your actors:
#![allow(unused)]
fn main() {
fn handle_message(&mut self, message: MessageEnvelope) {
    // Log message flow for debugging
    bindings::wasmind::actor::logger::log(
        bindings::wasmind::actor::logger::LogLevel::Debug,
        &format!(
            "Received message: {} from {} (scope: {}) with ID: {}",
            message.message_type,
            message.from_actor_id,
            message.from_scope,
            message.id
        ),
    );

    // Your message handling logic...
}
}
For more debugging tips and common issues, see Debugging.
Key Takeaways
- All actors receive all messages - filtering is done by individual actors, not the system
- The
Messagetrait is optional - it's a convenience for easier serialization/deserialization and helper methods - Message types enable coordination - actors coordinate by understanding common message schemas
- Correlation IDs link workflows - track multi-step processes with unique identifiers
- Scopes enable agent targeting - send messages to specific agents while allowing global listening
- Custom messages enable specialized coordination - define your own message types for unique workflows
- Broadcast is simple - one message reaches all actors simultaneously
Next Steps
Now that you understand message patterns, you're ready to build actors:
Build Tool Actors
Learn how to create actors that provide capabilities to AI assistants in Tool Actors.
Real Examples
See these patterns in action in Examples with complete coordination system implementations.
Testing Message Flows
Learn strategies for testing message interactions in Testing.
Understanding message patterns is the foundation for building multi-agent systems. Messages are not just data transfer - they're the coordination language that enables actors to work together.
Tool Actors
Tool actors are actors that expose capabilities (tools) to LLMs. They enable AI assistants to perform actions like executing commands, reading files, or interacting with external systems.
What is a Tool Actor?
A tool actor is any actor that:
- Broadcasts
ToolsAvailablemessages to announce its capabilities - Handles
ExecuteToolmessages to perform actions - Sends
ToolCallStatusUpdatemessages to report results
Tool actors are regular actors - they follow the same patterns you've already learned, just with a specific purpose (calling them tool actors is just a categorization we made up for convenience).
The Tool Pattern
Here's the basic flow of tool interactions:
1. Tool actor starts → Broadcasts ToolsAvailable
2. Assistant collects tools → Includes in LLM context
3. LLM generates tool call → Assistant sends ExecuteTool
4. Tool actor executes → Sends ToolCallStatusUpdate
5. Assistant receives result → Continues conversation
Building a Tool Actor (Rust)
The easiest way to build a tool actor in Rust is using the Tool derive macro:
#![allow(unused)] fn main() { use wasmind_actor_utils::{ tools, common_messages::tools::ExecuteTool, }; use serde::{Deserialize, Serialize}; #[derive(tools::macros::Tool)] #[tool( name = "read_file", description = "Read contents of a file", schema = r#"{ "type": "object", "properties": { "path": { "type": "string", "description": "The file path to read" } }, "required": ["path"] }"# )] pub struct ReadFileTool { scope: String, } #[derive(Debug, Clone, Serialize, Deserialize)] pub struct ReadFileParams { pub path: String, } impl tools::Tool for ReadFileTool { fn new(scope: String, _config: String) -> Self { Self { scope } } fn handle_call(&mut self, tool_call: ExecuteTool) { let params: ReadFileParams = match serde_json::from_str(&tool_call.tool_call.function.arguments) { Ok(params) => params, Err(e) => { // Send error ToolCallStatusUpdate and return return; } }; // Read the file let contents = match std::fs::read_to_string(¶ms.path) { Ok(contents) => contents, Err(e) => { // Send error ToolCallStatusUpdate and return return; } }; // Send success ToolCallStatusUpdate with file contents } } }
What the Tool Macro Does Automatically
When you use #[derive(tools::macros::Tool)], the macro generates all the actor boilerplate and handles the message flow for you. Here's what happens automatically:
1. On Actor Creation (new())
The macro automatically broadcasts a ToolsAvailable message to announce your tool:
#![allow(unused)]
fn main() {
// This happens automatically in the generated new() function:
broadcast(ToolsAvailable {
    tools: vec![Tool {
        tool_type: "function",
        function: ToolFunctionDefinition {
            name: "your_tool_name",        // From #[tool(name = "...")]
            description: "your description", // From #[tool(description = "...")]
            parameters: {...}               // From #[tool(schema = "...")]
        }
    }]
})
}
Note: The tool definition format follows LiteLLM's OpenAI API compatibility standard for function calling. For more details on tool schemas and function calling, see the LiteLLM function calling documentation.
2. Message Handling
The macro automatically:
- Listens for
ExecuteToolmessages from the same scope - Checks if the tool name matches yours
- Calls your
handle_call()method with the full message
3. What You Implement
You only need to provide:
#![allow(unused)]
fn main() {
impl tools::Tool for YourTool {
    fn new(scope: String, config: String) -> Self {
        // Your initialization logic
    }

    fn handle_call(&mut self, tool_call: ExecuteTool) {
        // Your tool's actual logic:
        // 1. Parse parameters from tool_call.tool_call.function.arguments
        // 2. Execute your tool's functionality
        // 3. Send ToolCallStatusUpdate message with result
    }
}
}
Everything else - the guest trait, bindgen exports, message routing - is handled by the macro.
Note: Your handle_call() method is responsible for sending ToolCallStatusUpdate messages to report results back to the requesting assistant.
Manual Tool Implementation
You can implement a tool actor manually without the derive macro by implementing the guest trait, exporting bindgen functions, and handling the message broadcasting yourself.
If you want to see what the macro generates, examine the macro source code in wasmind_actor_utils_macros.
Tool Parameters
Tools use JSON Schema to define their parameters. The schema is provided as a raw JSON string in the #[tool()] attribute:
#![allow(unused)]
fn main() {
#[derive(tools::macros::Tool)]
#[tool(
    name = "read_file",
    description = "Read contents of a file",
    schema = r#"{
        "type": "object",
        "properties": {
            "path": {
                "type": "string",
                "description": "The file path to read"
            },
            "limit": {
                "type": "integer",
                "description": "Maximum number of lines to read",
                "minimum": 1
            }
        },
        "required": ["path"]
    }"#
)]
pub struct ReadFileTool {
    scope: String,
}
}
The schema is included in the tool definition sent to the LLM via LiteLLM's OpenAI-compatible function calling format. This helps the LLM understand what parameters your tool expects and their constraints. For more information on parameter schemas and function definitions, see the LiteLLM function calling documentation.
Tool Status Reporting
Your tool actor communicates back to the assistant using ToolCallStatusUpdate messages with different status types and UI display information.
ToolCallStatus Types
#![allow(unused)]
fn main() {
pub enum ToolCallStatus {
    // Tool acknowledged the request - use for long-running operations
    Received {
        display_info: UIDisplayInfo,
    },

    // Tool waiting for system/user approval (rarely used)
    AwaitingSystem {
        details: AwaitingSystemDetails,
    },

    // Tool completed - success or error
    Done {
        result: Result<ToolCallResult, ToolCallResult>,
    },
}
}
UIDisplayInfo Structure
The UIDisplayInfo provides a clean interface in wasmind_cli's TUI:
#![allow(unused)]
fn main() {
pub struct UIDisplayInfo {
    pub collapsed: String,      // Short summary shown by default
    pub expanded: Option<String>, // Detailed view when expanded
}
}
Why UIDisplayInfo matters:
- Collapsed: Provides scannable overview (e.g., "ls: Success (15 files)")
- Expanded: Shows full details when user clicks to expand (complete output, error traces)
- User Experience: Programs building on Wasmind (like
wasmind_cli) use this info to display tool execution updates to users in a clean, organized way - Essential for good UX - users can scan tool results quickly and dive into details when needed
Example: Success Response
#![allow(unused)]
fn main() {
// For a successful file read
let ui_display = UIDisplayInfo {
    collapsed: format!("Read {}: {} bytes", filename, content.len()),
    expanded: Some(format!(
        "File: {}\nSize: {} bytes\n\nContent:\n{}",
        filename,
        content.len(),
        content
    )),
};

let result = ToolCallResult {
    content: serde_json::to_string(&json!({ "contents": content })).unwrap(),
    ui_display_info: ui_display,
};

// Send success status
let status_update = ToolCallStatusUpdate {
    status: ToolCallStatus::Done {
        result: Ok(result)
    },
    id: tool_call.tool_call.id,
    originating_request_id: tool_call.originating_request_id,
};
Self::broadcast_common_message(status_update).unwrap();
}
Example: Error Response
#![allow(unused)]
fn main() {
// For parameter parsing error
let ui_display = UIDisplayInfo {
    collapsed: "Parameters: Invalid format".to_string(),
    expanded: Some(format!(
        "Error: Failed to parse parameters\n\nDetails: {}\n\nExpected format: {}",
        error_message,
        expected_schema
    )),
};

let error_result = ToolCallResult {
    content: format!("Parameter error: {}", error_message),
    ui_display_info: ui_display,
};

let status_update = ToolCallStatusUpdate {
    status: ToolCallStatus::Done {
        result: Err(error_result)
    },
    id: tool_call.tool_call.id,
    originating_request_id: tool_call.originating_request_id,
};
Self::broadcast_common_message(status_update).unwrap();
}
Message Types Summary
Tool actors work with these key message types:
#![allow(unused)]
fn main() {
// Announce available tools (sent automatically by macro)
pub struct ToolsAvailable {
    pub tools: Vec<Tool>,
}

// Request tool execution (received from assistants)
pub struct ExecuteTool {
    pub tool_call: ToolCall,
    pub originating_request_id: String,
}

// Report execution status (sent by your handle_call method)
pub struct ToolCallStatusUpdate {
    pub status: ToolCallStatus,
    pub id: String,
    pub originating_request_id: String,
}
}
Example: File Reading Tool
Here's a complete example of a file reading tool:
#![allow(unused)] fn main() { use wasmind_actor_utils::{ tools, common_messages::tools::{ExecuteTool, ToolCallResult, ToolCallStatus, ToolCallStatusUpdate, UIDisplayInfo}, messages::Message, }; use serde::{Deserialize, Serialize}; #[derive(tools::macros::Tool)] #[tool( name = "read_file", description = "Read contents of a text file", schema = r#"{ "type": "object", "properties": { "path": { "type": "string", "description": "The file path to read" } }, "required": ["path"] }"# )] pub struct ReadFileTool { scope: String, } #[derive(Debug, Clone, Serialize, Deserialize)] pub struct ReadFileParams { pub path: String, } impl tools::Tool for ReadFileTool { fn new(scope: String, _config: String) -> Self { Self { scope } } fn handle_call(&mut self, tool_call: ExecuteTool) { // Parse parameters let params: ReadFileParams = match serde_json::from_str(&tool_call.tool_call.function.arguments) { Ok(params) => params, Err(e) => { // Send error status with helpful UI info let ui_display = UIDisplayInfo { collapsed: "Parameters: Invalid format".to_string(), expanded: Some(format!("Failed to parse parameters: {}", e)), }; let error_result = ToolCallResult { content: format!("Parameter parsing error: {}", e), ui_display_info: ui_display, }; let status = ToolCallStatusUpdate { status: ToolCallStatus::Done { result: Err(error_result) }, id: tool_call.tool_call.id, originating_request_id: tool_call.originating_request_id, }; Self::broadcast_common_message(status).unwrap(); return; } }; // Read the file using standard library (works in WASM) let contents = match std::fs::read_to_string(¶ms.path) { Ok(contents) => contents, Err(e) => { // Send error status with file error details let ui_display = UIDisplayInfo { collapsed: format!("Failed to read {}", params.path), expanded: Some(format!("File: {}\nError: {}", params.path, e)), }; let error_result = ToolCallResult { content: format!("Failed to read file: {}", e), ui_display_info: ui_display, }; let status = ToolCallStatusUpdate { status: ToolCallStatus::Done { result: Err(error_result) }, id: tool_call.tool_call.id, originating_request_id: tool_call.originating_request_id, }; Self::broadcast_common_message(status).unwrap(); return; } }; // Send success status with file contents let ui_display = UIDisplayInfo { collapsed: format!("Read {}: {} bytes", params.path, contents.len()), expanded: Some(format!( "File: {}\nSize: {} bytes\n\nFirst 500 chars:\n{}", params.path, contents.len(), &contents[..contents.len().min(500)] )), }; let result = ToolCallResult { content: serde_json::to_string(&serde_json::json!({ "path": params.path, "contents": contents })).unwrap(), ui_display_info: ui_display, }; let status = ToolCallStatusUpdate { status: ToolCallStatus::Done { result: Ok(result) }, id: tool_call.tool_call.id, originating_request_id: tool_call.originating_request_id, }; Self::broadcast_common_message(status).unwrap(); } } }
Configuration
Add tool actors to your wasmind configuration:
[[actors]]
name = "execute_bash"
path = "./actors/execute_bash"
enabled = true

[[actors]]
name = "file_reader"
path = "./actors/file_reader"
enabled = true
Language Support
Currently, tool actors are easiest to build in Rust with the provided macros and utilities. We will add support and examples for more languages soon.
Best Practices
- Clear tool names and descriptions - Help the LLM understand when to use your tool
- Validate parameters - Always validate input before executing
- Handle errors gracefully - Return clear error messages
- Document parameter schemas - Use descriptions in your schema definitions
- Keep tools focused - Each tool should do one thing well
Next Steps
- See Examples for complete tool actor implementations
- Learn about Message Patterns for coordination
- Explore existing tool actors in the
/actorsdirectory
Testing
Unit Testing
You can test your actor logic using standard Rust testing:
cargo test
Write unit tests for your actor's business logic, message parsing, and utility functions as you would with any Rust project.
Integration Testing
We're exploring options for an integration testing framework to test actor message flows and multi-actor interactions.
More Coming Soon
Additional testing strategies and tools will be added as the testing framework evolves.
Debugging
Viewing Message Flow
To see all messages flowing through the system, set the WASMIND_LOG environment variable:
# Debug level shows all messages
WASMIND_LOG=debug wasmind_cli

# Other log levels
WASMIND_LOG=info wasmind_cli   # Default
WASMIND_LOG=warn wasmind_cli   # Warnings and errors only
WASMIND_LOG=error wasmind_cli  # Errors only
Memory Constraints
WebAssembly components have a 4GB memory limit due to 32-bit addressing (WASM uses i32 for memory addresses). Watch out for:
- Out of Memory (OOM) errors - Large file operations or data processing can hit the 4GB limit
- Large message payloads - Broadcast messages go to all actors, consuming memory
If your actor crashes unexpectedly, check for OOM issues by looking for memory-related errors in the logs.
Actor Crashes
If wasmind_cli shows that an actor's main function errored, check the logs for detailed error messages. The logs will contain the actual error that caused the crash, including stack traces and error descriptions.
More Coming Soon
This section will be expanded with additional debugging strategies and troubleshooting guides.
Examples
For complete example actors and implementations, see the actors directory.
More examples coming soon.